
| » Forum Index » Image doctor » Topic: Changing the Color of the Rose |
|
Posted on 30/07/13 6:18:16 PM |
|
ConnieR.
* Posts: 51 Reply |
Changing the Color of the Rose
I've been trying to change this yellow rose into a white one, but somehow it's not working. I tried the different techniques in the book (Hue/Saturation, overlay, etc) for changing colors, but this just doesn't work!  |
Posted on 30/07/13 6:44:05 PM |
|
maiden
Golden Gif Gagster Posts: 471 Reply |
Re: Changing the Color of the Rose
Silly question but have you tried the Replace Color tool? I did this with that Tool and a bit of History Brush to clean up any over spill.  |
Posted on 31/07/13 3:28:20 PM |
|
Sjef
Flying Dutchman Posts: 571 Reply |
Re: Changing the Color of the Rose
Another way: 1. Select the rose (could be done by painting with black in Quick Mask mode); 2. Remove artefacts and other misbehave with Surface Blur 5/5. The rose gets a little softer (the edges keeps sharp); 3. Open Hue/Saturation with Ctrl»U and select Yellows; 4. Now set the sliders as shown in the picture. 5. You could leave the rose selected, hit Ctrl»L to start Levels and see what you can do on the Red Channel with the middle slider in the Input Levels dialog (if you'd whish). It's no longer 'The yellow rose of Texas' so now it could be 'The white rose of Athens': https://www.youtube.com/watch?v=mRpMCG5Wjck 
|
Posted on 31/07/13 3:57:31 PM |
|
ConnieR.
* Posts: 51 Reply |
Re: Changing the Color of the Rose
Maiden, yes, I did try the replace color tool, but the rose looks too gray. Sjef, is there any way to fix the blown out highlights? Thank you both for your replies. |
Posted on 31/07/13 5:30:16 PM |
|
Luis
Six-String Synthesist Posts: 236 Reply  |
Re: Changing the Color of the Rose
This is easy to do. What I did was I created a Color Fill Adjustment Layer and set the color to white. I made sure that the layer mask was set to black. The Layer Blend mode set at Hue. Now use a soft edge brush with a color of white and paint the rose on the adjustment layer mask. Once done, lower the fill to 92%. This will let some yellow to appear. From pictures I've seen on google, there is some hint of yellow on the white rose. I hope this helps. Luis 
|
Posted on 01/08/13 10:16:50 AM |
|
Ben Mills
Luminous Luminary Posts: 570 Reply |
Re: Changing the Color of the Rose
Select the area you wish to change (yellow in this case} - then use a gradient map adjustment layer and adjust the colour stops to your liking.  |
Posted on 15/08/13 5:24:10 PM |
|
ConnieR.
* Posts: 51 Reply |
Re: Changing the Color of the Rose
Thank you everybody. I guess my mistake was trying to get the rose too bright white. |
Posted on 22/08/13 6:04:13 PM |
|
salfordnurse
Intensive Illustrator Posts: 207 Reply |
Re: Changing the Color of the Rose
Been away for a while, but thought I'd come up with my solution, not 100% photoshop though (hope thats OK), but I thought I'd share to show my photoshop working. Ive recently fallen in love with lightroom and now use the two in tandem for my photo editing, and photoshop alone for montage work. I love the fact you can desaturate individual colours in lightroom and target specific areas as well. I did the majority in lightroom then in photoshop 1. I copied the layer and applied a gaussian blur to it. this evened out the colours in the yellow areas a bit so they weren't as noticeable and also softened the slightly grey areas from the desaturation, making them appear more like shadows 2 Then made a colour range selection of the green area, and added to the selection the areas close to the bottom of the flower where it attaches to the stem (I used Quick mast that way I could use a soft brush) and created a mask. 3 then created a photo filter adjustment layer and clipped to the layer, I selected a pastel greeny grey colour and set it at around 70% 4 I then adjusted the opacity to my liking so you got some of the yellow showing plus a bit of the green which suggests they are picking up some of the colour from the leaves around them and also gives the impression the leaves are slightly opaque and you can see the foliage behind them. What I love is we have all come up with a wide range of solutions which just shows the versatility of the software Simon   |
Posted on 26/08/13 9:39:16 PM |
|
michael sinclair
Off-Topic Opportunist Posts: 1752 Reply |
Re: Changing the Color of the Rose
The war of the roses: you all missed the trick of making the background darker (after colour balance, contrast, and saturation); anyway, I select Red in the "Hue & Contrast" desaturated the red, but then I went on to the "Colourize" and chose a greeny hue to put a bit of natural colour back into the "grey" rose. I then selected Adjustments and went into the Brightness and Contrast window and selected "LEGACY". After that it was tweaking this and tweaking that, but I found I had a lot of latitude in Shadows and Highlights for that final effect. 
NB the "pixelated" effect is due to the low resolution of the original image submitted 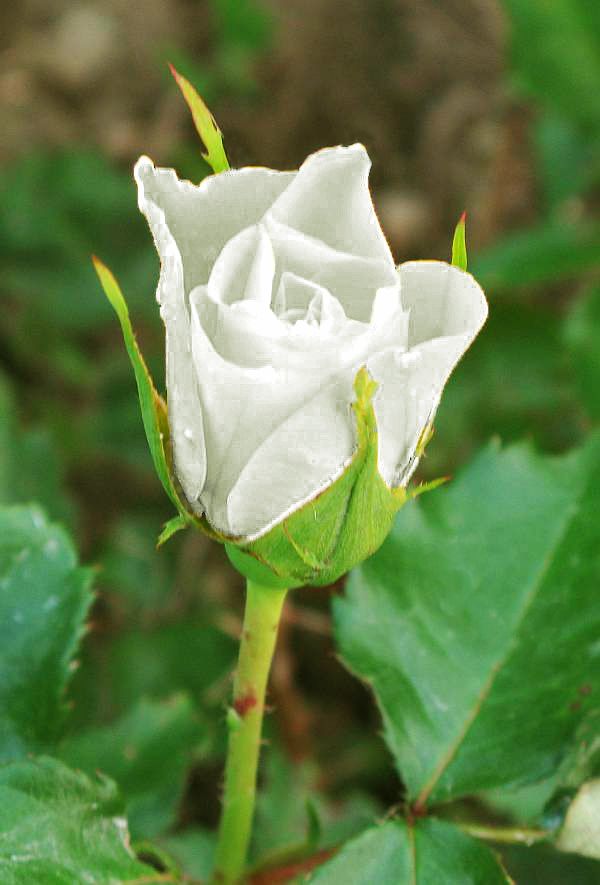

|
Posted on 05/02/14 9:18:37 PM |
|
Claudio_F.
* Posts: 20 Reply |
Re: Changing the Color of the Rose
I know this is an old post, but I'm new here so... Changing a colour is something that happen very frequently, so I will like to share one solution that it's the best that I know: it's very precise and very, very fast (it takes only less than 2 minuts to be done). Below you see the result and if you are interested to see how it's done, here is a link to a video that I have done bcs - to me - it's more easy to show it than explain it. http://facilla.info/colour_change/changing_a_colour.html 
_________________ "I'm curious about everything, even things that don't interest me." -- Alex Trebek |