
| » Forum Index » Problems and solutions » Topic: Wannabe Positive |
|
Posted on 10/01/07 6:21:51 PM |
|
tank172
ThreeDee Thriller Posts: 692 Reply |
Wannabe Positive
I've come across a stack of negatives from a film camera. These negatives look pretty old. Instead of going to a print company to pay $$$ to get them developed, can I scan a negative into Photoshop, and somehow convert it to a full color picture? Of course, I could paint the colors in myself, ie greyscale to color...but can I click a button for Photoshop to convert the negative to the original photograph's colors? Thanks Chris |
Posted on 10/01/07 6:37:37 PM |
|
dave.cox
Marquee Master Posts: 518 Reply  |
Re: Wannabe Positive
Hi Chris I scan negatives in all of the time. The better scanner that you use the better. Preferrably 1200 dpi, so you will have enough information to expand them to a full size photo. If the negatives are full color to start with, all you have to do is invert the colors in photoshop, and you are good to go. As negatives get older, the colors tend to fade though, and some of your colors may even be lost completly. It's not uncommon for the result to have only the reds left. In this case the best thing to do is desaturate the colors, to make them black and white, or use the colorize option to make them sepia. I find that you can see more details when they are sepia than grey scale. The only way to convert them back to color at this point is to manually colorize them. It can be done, but is time consuming, so it just depends how much time you have to put in to them. |
Posted on 10/01/07 6:45:53 PM |
|
tank172
ThreeDee Thriller Posts: 692 Reply |
Re: Wannabe Positive

Wow! I use invert all the time...can't believe I didn't think of that for this application. 
Thanks, Dave. I'll give it a shot when I get home this evening. |
Posted on 10/01/07 10:55:02 PM |
|
Pierre
Constructional Confabulator Posts: 637 Reply |
Re: Wannabe Positive
I actually use a scanner that comes with a negative holder, scans at up to 2400 ppi and inverts the colours! It is already 2 years old and I paid a whopping 149$ (canadain) for it. Sorry for the advertisement: Canon Canoscan LiDE 5000F (I still see it in stores but don't remember the price it retails for now). Here's an example, slightly adjusted in PSCS2:  _________________ |
Posted on 11/01/07 03:22:43 AM |
|
vicho
Ingenious Inca Posts: 248 Reply  |
Re: Wannabe Positive
by far the best choice would be Pierre`s suggestion, a scanner with a negative holder, you only do this: 1- scan the negative 2- click on the negative icon (depending on the scanner) 3- open it in photoshop and it`s full color!! (provided it`s a "color negative" of course) i recommend HP scanner in this case the results are awesome |
Posted on 11/01/07 03:24:46 AM |
|
vicho
Ingenious Inca Posts: 248 Reply |
Re: Wannabe Positive
by far the best choice would be Pierre`s suggestion, a scanner with a negative holder, you only do this: 1- scan the negative 2- click on the negative icon (depending on the scanner) 3- open it in photoshop and it`s full color!! (provided it`s a "color negative" of course) i recommend HP scanner in this case the results are awesome |
Posted on 11/01/07 04:50:09 AM |
|
dave.cox
Marquee Master Posts: 518 Reply |
Re: Wannabe Positive
Chris, I forgot to mention, that I use an HP scanner that can backlight the film. This is important to scan in negatives, since the are basically transparancies. My scanner will scan up to 9600, but I have found that for most purposes it really isn't neccessary to go more than 1200, and just makes the file larger than it needs to be. You can set it to automatically convert the colors, but I find that it is very slow to have the scanner do it, so I do it in photoshop. Quality is about the same either way. Here is a photo that I scanned from an old, (about 60years) photo of my mother in law from a black and white negative. I then used photoshop to adjust the contrast, and colorized it. I added the forest in the background for interest to replace a plain white sky. A lot of photos can be restored by using photo shop to color adjust them, sharpen them, and correct other problems, both black and white and color. I can post a fairly sure fire method that I use to color correct later if anyone is interested. 
|
Posted on 11/01/07 05:20:50 AM |
|
dave.cox
Marquee Master Posts: 518 Reply |
Re: Wannabe Positive
I don't know how many negatives you have, but if you don't want to invest in a scanner that can handle transparencies, you can send me a PM and I'll give you a quote to do them for you. |
Posted on 11/01/07 7:57:27 PM |
|
tank172
ThreeDee Thriller Posts: 692 Reply |
Re: Wannabe Positive
Thanks for all the helpful comments, guys. I tried the invert command last night with complete failure. I have a Canon PIXMA MP160 all-in-one that scans up to 1200 dpi. The scan does not come out clear at all, either. Looking directly at the negatives, all have a strong red hue. Also, they are color negatives. After I scan them, the red hue is pretty dark...I lighten the negative and invert...played with a few adjustment layers. Eventually, I could just make out who is in the image and what they're doing. When I invert, the image is extremely washed out with a slight cyan color. Naturally, I play with curves & levels. I'm using sRGB mode. After farting around with these negatives for a couple of hours, I'm still having trouble figuring out what's wrong. Usually, especially in Photoshop...I can emprovise, or eventually find a method that works. This is clearly not the case, though. I did find an option on the Scanner's dialogue that inverts negatives...but all that did was wash out the image. Steve! HTCIP doesn't mention negatives! 
Dave, what do you mean by "backlight the film" capability? Pierre, That's exactly what I'm looking for! Why does 1200 dpi scan so badly for me? |
Posted on 11/01/07 10:30:25 PM |
|
dave.cox
Marquee Master Posts: 518 Reply |
Re: Wannabe Positive
Your negatives are transparencies, just like you would use on an overhead projector. To properly scan them, you need a scanner that can shine the light through the transparency. This is done in most cases by turning off the primary scanner light, and turning on a secondary light behind the negative. This might be located in a separate attachment that also holds the negative, or in the lid of the scanner, to "backlight" the negative. The scanner that I use is an HP 7100 series, which is specifically designed to handle this special type of scanning, and is ultra hi-resolution. Extra resolution is needed for negatives, because the arey are extra small originals. Also if your colors are off, it may be because the colors are fading in the negatives. As the inks get older, they tend to fade, leaving you with a red photo. |
Posted on 11/01/07 11:29:46 PM |
|
tank172
ThreeDee Thriller Posts: 692 Reply |
Re: Wannabe Positive
..oh, I don't have that feature. 
There must be a 'cheat' for this method using a standard scanner? 
...time for some creative thinking with a scanner, me thinks... 
|
Posted on 11/01/07 11:37:53 PM |
|
tank172
ThreeDee Thriller Posts: 692 Reply |
Re: Wannabe Positive
I'm not at home to try this, but what if there's a feature to turn off the scanner light during a scan, place the negative on the platen, keep the cover open during the scan while shining a bright flourescent light just above the negative? Seems like that would produce the same effect? Yes, I'm reaching!   |
Posted on 12/01/07 02:34:35 AM |
|
dave.cox
Marquee Master Posts: 518 Reply |
Re: Wannabe Positive
I'm not aware of any way to turn the light off with most scanners, and if you disconnect it the software will most likly detect it as an error and then will refuse to scan. With the light on, I don't think you will get a good scan of the negative. You'll most likely just get glare from the light on the front side. That light by design if very bright, and place right next to the scan element to get the most from the light. That is why you can see it move during a scan if you leave the top open. If you do figure something out, I would be interested in knowing what you came up with. |
Posted on 12/01/07 02:35:29 AM |
|
tank172
ThreeDee Thriller Posts: 692 Reply |
Re: Wannabe Positive
Checked on the feature...not an option in the menu bar. The only way to cheat would be to take out the scanner bulb....  |
Posted on 12/01/07 02:36:40 AM |
|
tank172
ThreeDee Thriller Posts: 692 Reply |
Re: Wannabe Positive
More ideas to come... |
Posted on 12/01/07 03:04:20 AM |
|
Pierre
Constructional Confabulator Posts: 637 Reply |
Re: Wannabe Positive
Dave is right you need to balckight the negatives. My scanner does that with a small apparatus that you connect to the scanner. This connection tells the scanner to turn off the main scanning light and use this secondary source. You can also scan positives (slides) if you remove them from their plastic/cardboard frame first. Sorry not to have mentioned it! Here's the gadget that produces the light (you put it on top of the holder) and the negative holder (picture comes form the Net): 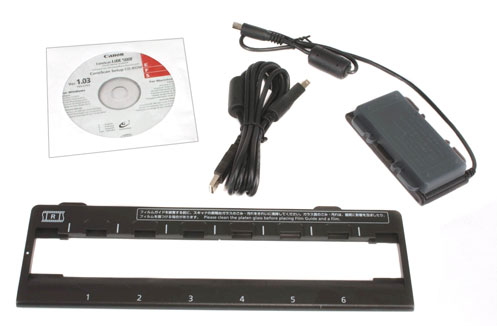 _________________ |
Posted on 12/01/07 10:45:47 AM |
|
paul_2006
Guest Reply |
Re: Wannabe Positive
If you don't want to invest in a proper scanner then just get the negs put onto a CD at a photo processing store. You can then print them out yourself. It's probably the most cost effective solution if you only have a few to do and are not likely to need to do any in the future. |
Posted on 12/01/07 9:38:16 PM |
|
Bob
Expert Expressionist Posts: 130 Reply |
Re: Wannabe Positive
Chris, I'm surprised that your scanner doesn't have a backlight for transparencys. Most seem to have them these days. However, there are some things you can try without a lot of expense. The main thing is that you will need to get light shining through the negative from the back. Also, if your lid background is light, you'll need to make an opaque mask to block out the area where there will be no film so the scanner won't expose for the lid instead of the negative. Here are a couple of URLs for cheap ways to get a backlight. This one uses a white paper tent to provide a difuse backlight: http://www.abstractconcreteworks.com/essays/scanning/Backlighter.html This one uses a flourescent flashlight: http://www.afn.org/~afn11300/slides.html Your negative will have an orange color to it. Scanners with backlights builtin provide a color negative setting to remove this. Typically, they adjust the green and blue exposures to compensate. Since yours doesn't have a negative setting, you'll have to do it in Photoshop which isn't the same. You'll probably have some clipping. Doesn't hurt to try though. Or, better yet, try vuescan instead of your regular scanner software to capture the photo. It can do the mask removal. See http://www.hamrick.com/ for a free trial. It's inexpensive if you want to purchase. |
Posted on 15/01/07 01:33:29 AM |
|
tank172
ThreeDee Thriller Posts: 692 Reply |
Re: Wannabe Positive
Perfect! Thank you, Bob! I love making little devices! These links were exactly what I was looking for! Chris |
Posted on 15/01/07 06:43:33 AM |
|
Bob
Expert Expressionist Posts: 130 Reply |
Re: Wannabe Positive
I can't resist a good gadget! <g> Let us know how it worked out. |