
| » Forum Index » Problems and solutions » Topic: Starburst effect |
|
Posted on 07/05/07 08:22:15 AM |
|
tooquilos
Wizard of Oz Posts: 2972 Reply |
Starburst effect
I was hoping someone maybe able to enlighten me as to how to achieve this particular starburst effect? Doesnt need to be exactly the same as the attachment image..but just something along those lines. Ive had a feeble attempt using the wave generator combined with the twirl filter..but you dont want to see how it turned out 
Thank you Anna   |
Posted on 07/05/07 10:54:24 AM |
|
Wayne
Printers Devil Posts: 312 Reply |
Re: Starburst effect
I think you'll get somewhere close using the 'radial blur' filter, and a lot of trial and error. First off create a solid-filled black layer with a new layer on top of it. Draw a rough 'X' right in the middle of the transparent layer with a large, hard brush. Make the cross irregular. Apply the radial blur filter (Filter > Blur > Radial Blur) Set it to 'zoom' with the amount set to '100%' Repeat the filter as many times as necessary (you can introduce new colours at any time by painting another blob of colour in the middle of the design and then continuing the blurring. You can also use Unsharp mask to bring out the lines if you want. The final result depends on the size/shape/number of arms of the original cross, and how many times you blur/sharpen it. I did this one using white and yellow and repeated the radial blur about fifteen times and sharpened it a couple of times in between the blurring.  |
Posted on 07/05/07 3:18:01 PM |
|
tooquilos
Wizard of Oz Posts: 2972 Reply |
Re: Starburst effect
Thank you Wayne for your help. This is what I can up with following your tutorial. Im very pleased with it. Right at the end, once I felt satisfied with the overall effect, I added a lens flare in the middle. That gave it a bit of extra "oomph" Anna  |
Posted on 07/05/07 5:08:51 PM |
|
Wayne
Printers Devil Posts: 312 Reply |
Re: Starburst effect
You're welcome, glad you got where you wanted to go! |
Posted on 08/05/07 01:52:13 AM |
|
dave.cox
Marquee Master Posts: 518 Reply  |
Re: Starburst effect
Cool effect Wayne! 
I tried it out, added a white spot in the middle and continued to blur, then copied to a new layer, twirled it, and blured some more. Used the new layer as the back ground for the corona. Neat starburst!  |
Posted on 08/05/07 03:33:15 AM |
|
dirtdoctor23
Guest Reply |
Re: Starburst effect
Tried the zoom on the radial blur, Wayne. Then at the end tried a little spin instead of zoom on the radial blur (bout 20%) and it works much faster. Thanks. Neil  _________________ "I haven't failed.... I've found 10,000 ways that don't work!" Thomas Edison |
Posted on 08/05/07 09:01:02 AM |
|
tooquilos
Wizard of Oz Posts: 2972 Reply |
Re: Starburst effect
After persevering for most the day today I have finally been able to achieve exactly what I wanted.
I needed a starting point, so thank you Wayne once again  |
Posted on 08/05/07 10:16:16 AM |
|
Wayne
Printers Devil Posts: 312 Reply |
Re: Starburst effect
Good stuff everybody. It's not an original idea, I based the technique on a "light-blast" tutorial I found. I used the tutorial to create an image when I was stuck for an idea for the '2007' challenge. Let me know, if you want I'll post the full tutorial. 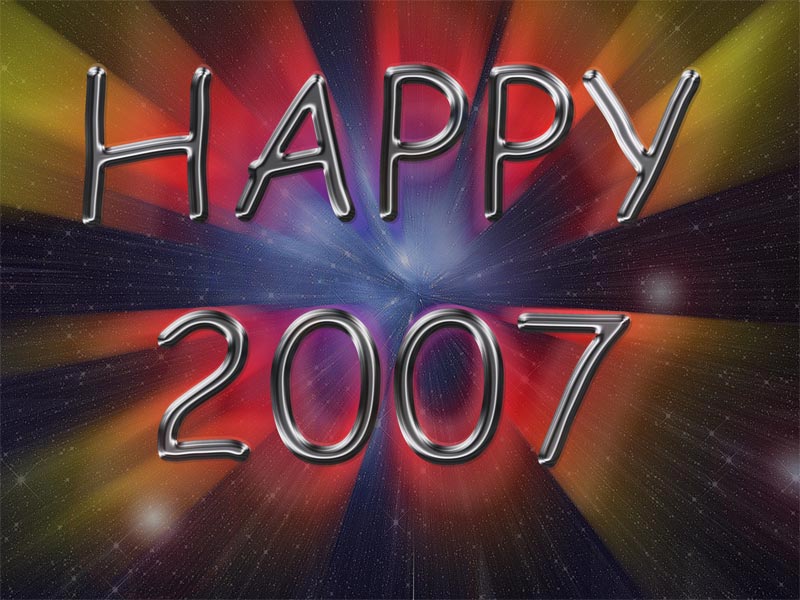 |
Posted on 08/05/07 11:20:57 AM |
|
rufus
Destructive Demon Posts: 243 Reply  |
Re: Starburst effect
Here's my way. 1. Start with a black background layer and add a new layer. 2. Select the 'custom shape tool' and choose 'boom1' from the list. 3. Make sure that 'fill pixels' is selected, and with the foreground colour set to white draw the shape. 4. Blur the shape with 'gausian blur'. 5. Blur the shape with 'radial blur' (Amount 100). 6. Dupilcate the layer (Ctrl-J) and lock the pixels. 7. Fill this shape with another colour (shift-f5), (I used yellow). 8. Flip horizontal and offset the shape with the move tool. 9. Repeat steps 6 & 7 using a different colour (I used red). 10. Flip vertical and offset the shape with the 'move tool'. 11. Change the layer order so that the white shape layer is on top. 12. Change the opacity of the colour layers to suit. rufus  |
Posted on 08/05/07 8:03:45 PM |
|
vicho
Ingenious Inca Posts: 248 Reply  |
Re: Starburst effect
hi Wayne , cool effect!! the background with the stars looks great!
post the tutorial..!! |
Posted on 08/05/07 9:13:19 PM |
|
Wayne
Printers Devil Posts: 312 Reply |
Re: Starburst effect
Here's the tutorial (I think I applied a gradient rather than a colour overlay in step 6 and placed a photo of a star field behind the effect and then radial-blurred the star field) Lightblast! Richard Harrington Looking for a way to give some extra life to a logo or type treatment? The two most common techniques to help a logo standout are a glowing edge or a drop shadow. This is based on the principle of type on pattern, which says that a contrasting edge makes it far easier to see something when it is positioned over a busy or moving background. But why be ordinary? By backlighting an image, we can dramatically offset it from its background. This technique works with almost any logo or type treatment. 1.Position the logo. Position the logo where you want it on screen. Use alignment tools to center the logo if needed. 2.Duplicate the logo layer. Make a copy of the logo by duplicating the layer: choose Layer > Duplicate Layer. Name the duplicate layer Light 1. Place the copy above the original logo. 3.Blast it! Apply the Radial Blur on the duplicate layer (Filter > Blur > Radial Blur). Set the amount to 100, the Blur Method to Zoom, and the Quality to Good. Click OK. 4.Fill it. Load the default colors by pressing D. Load the layer named Light 1 by Cmd + clicking (Mac OS) or Ctrl + clicking (Windows) its thumbnail in the layers palette. Fill the selection by pressing Option + Delete (Mac OS) or Alt + Delete (Windows). Deselect the layer by choosing Select > Deselect 5.Extend it. Repeat the blur/load/fill cycle until your rays are the desired length. You can run the last filter again choosing Filter > Radial Blur (the top menu item), this applies the last filter with its last previously used values. In the example (which is for a video) I repeated the cycle three times to achieve my look. Depending on the resolution of your composition you may need to run the combination more or less times. 6.Color it. On the blurred layer named Light 1, apply the Color Overlay layer style by choosing Layer > Layer Style > Color Overlay. Select the desired color and adjust opacity to taste. You should get a real-time preview of your work if the Preview box is checked. Click OK 7.Build it. Move the glow layer, light1, behind the logo by dragging it below the logo layer in the Layers paletteso the beams shoot past. You may choose to place a background image behind the logo. Optionally, you may also choose to place an additional copy of the beam layer on top. Adjust the opacity to make the color look like it has wrapped around the logo. |
Posted on 09/05/07 06:29:55 AM |
|
Wayne
Printers Devil Posts: 312 Reply |
Re: Starburst effect
Here's the example image used by the author of the tutorial |
Posted on 09/05/07 07:06:04 AM |
|
tooquilos
Wizard of Oz Posts: 2972 Reply |
Re: Starburst effect
Theres some great ideas here for some really great effects. Thank you for your tips and tutes. Guess what Ill be doing for the next week? ...starbursting!!!! |