| » Forum Index » Problems and solutions » Topic: Brush-on-color |
|
Posted on 28/12/10 8:08:19 PM |
|
Zorin
* Posts: 6 Reply |
Brush-on-color
I was following the tutorial on brush-on-color, when i put to much paint on the skin. When i used the eraser tool it started rubbing away the models skin to reveal the background. Then by accident i clicked on the history brush tool (y), it worked a charm only removing the paint. I know i'm only on page 35 of the cs5 book, but do the more experienced users find the history brush useful? Thanks |
Posted on 29/12/10 09:23:05 AM |
|
Nick Curtain
Model Master Posts: 1781 Reply |
Re: Brush-on-color
Hi Zorin I've tried the Colour replacement tool, but do find it incredibly difficult to get on with. Effectiveness depends on the the sample method and the tolerance level used and it's far from simple when there are similar colours next to the one you are attempting to change. I've also found that the colour produced is often not what you're looking for. You will find with PS that there many ways to achieve a task and I use methods which suit me. The CR tool will be great in some situations and thousands probably love it, but personally I do find it very frustrating. I've attached an image Steve gave us for a Friday Challenge to show you a technique, which offers complete control and which may be useful to you. The old car is pretty drab and let's suppose we want to make it more snazzy with a new paint job. You will see that the side windows have taken on nearly the same colour as the paintwork, so any automated process would struggle in these situations. While PS is excellent, sometimes there is no alternative but to roll your sleeves up and get stuck into manual selection work. Create a new layer above the car and change your foreground colour to a bright red. Change the layer blend mode to colour and paint the areas you wish to change. Create a Hue and Sat adjustment layer and clip it to the colour layer. When you change the Hue, the colour will change and you can alter the saturation as well. You will find that the lightness slider has little effect, so extra flexibility can be achieved by loading the colour layer as a selection and creating a new Levels adjustment layer above the car. When you change the gamma (middle slider), the car will lighten or darken and deepen or lighten the colour. Yes, the history brush is fantastic, but if you exceed the allowed number of history states you've set, it may be impossible to go back beyond a certain point if you've been clicking away merrily making loads of paint strokes. The method I've show you uses adjustment layers and masks, which can be changed continuously and therefore provides ultimate flexibility, enabling you to change your mind at any time. Unfortunately I don't have the CS5 book, but on P35 of the CS4 book, there is a girl with a red shirt and I assume we're looking at the same image. My advice would be to duplicate the girl layer and work on that. The golden rule is never work on the original. If you create a layer mask for the Girl copy, you can show and hide the pixels, without erasing the original. Nick 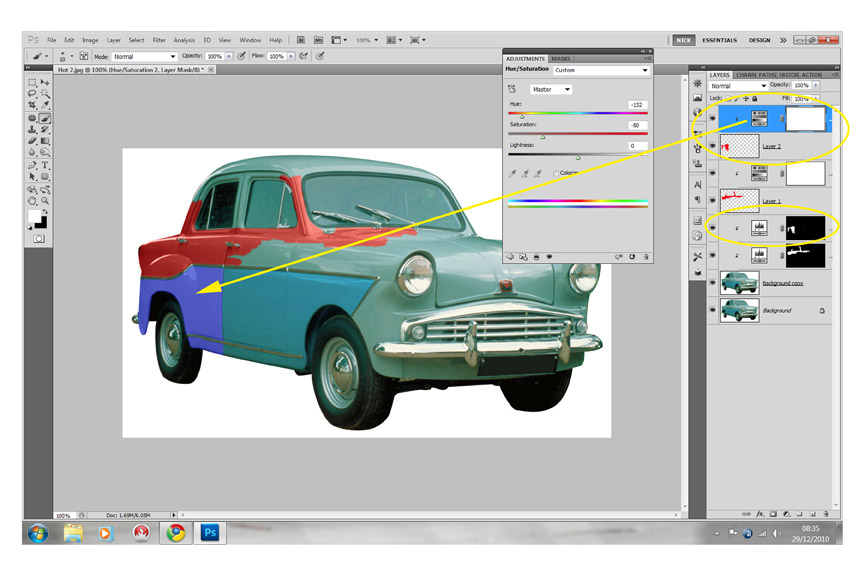 |
Posted on 30/12/10 12:50:35 PM |
|
Zorin
* Posts: 6 Reply |
Re: Brush-on-color
Thanks for the in-depth response Nick. |