| » Forum Index » Problems and solutions » Topic: Background eraser |
|
Posted on 03/04/07 08:46:07 AM |
|
chris berry
Overhead Overlord Posts: 724 Reply  |
Background eraser
Got a person shot against a white-grey background with shadows. Client wants the background to be pure white, so I'm using the background eraser to cut around the model's hair. Experimented with different settings but keeping hitting a problem: I don't get a "clean" erase. The erased area has either smudgy grey bits, or when I start a new erase, you can see where it had overlapped the previous one. Tried turning up the tolerance but this rubs out the hair. Settings are on discontigous. |
Posted on 03/04/07 08:51:06 AM |
|
Steve Caplin
Administrator Posts: 7115 Reply |
Re: Background eraser
Shadows are often tricky here. Can you post a low res of the image so we can try it? |
Posted on 03/04/07 09:09:28 AM |
|
chris berry
Overhead Overlord Posts: 724 Reply |
Re: Background eraser
Here it is. Out on a job now so will check back later today. Thanks! 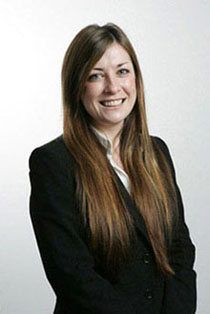 |
Posted on 03/04/07 2:25:39 PM |
|
GKB
Magical Montagist Posts: 4103 Reply |
Re: Background eraser
Hi Chris, Go to channels and duplicate the channel which has the highest contrast. In this case I chose the blue channel. Using this duplicate go to Image>Apply image and select 'Multiply' from the blending menu. The contrast increases dramatically. Go to Levels and move the white slider to the left until you see the background go white. Black slider to the right until the girl goes very dark. You will probably still have some detail showing on her face and blouse. Select a hard edged black brush and paint over all the face and blouse still showing. Don't go near the edge. On this particular image you should, by now, have a pure black and white image in your channel which you can Ctrl-click for a selection. Go back to the RGB image and delete the background. Other images will probably require far more tweaking than this one but, as it starts out as a fairly high contrast image it was quite quick to do. It might all sound a long job but doing it this way is far quicker than the pen tool or background eraser. You might like to check out 'Photoshop Masking & Compositing' by Katrin Eismann which is a little goldmine on the subject. Gordon |
Posted on 03/04/07 2:26:54 PM |
|
GKB
Magical Montagist Posts: 4103 Reply |
Re: Background eraser
Of course, it always helps to actually attach the image!!  |
Posted on 03/04/07 2:42:12 PM |
|
chris berry
Overhead Overlord Posts: 724 Reply |
Re: Background eraser
Wow! I'll have to try this one - it looks complicated at first but well worth a try if Iever get a batch to do. This one's going in my tips file. Thanks again as ever - once more someone on the forum's helped me out of a jam! Cheers Chris |
Posted on 04/04/07 11:01:11 AM |
|
chris berry
Overhead Overlord Posts: 724 Reply |
Re: Background eraser
GKB - Tried the channels method - it's pure genius but it's erasing the stray hairs around her head. This is a really picky client so looks like it's back to magic eraser - unless there's away around it with the settings. The other method which seems to work quite well is dodging the background around the hair - this erases the background but leaves the hair. Will use the channels methoid on another project, however! Cheers Chris |
Posted on 04/04/07 12:03:29 PM |
|
Steve Caplin
Administrator Posts: 7115 Reply |
Re: Background eraser
The magic eraser should be straightforward with a photo like this. Hard to see where you're going wrong. You should be using a hard-edged brush, set to Sample Once, if that helps! |
Posted on 04/04/07 12:18:29 PM |
|
chris berry
Overhead Overlord Posts: 724 Reply |
Re: Background eraser
Thanks Steve I think I've been using too big a brush - shrunk it down and it seems to work better. Still losing the really fine hair on some shots butI can live with it. |
Posted on 04/04/07 2:01:17 PM |
|
GKB
Magical Montagist Posts: 4103 Reply |
Re: Background eraser
Hi Chris, Yes you found the problem with over use of this technique but it is quite easy to keep the hairs - even single strands. Unfortunately the photographs was of such low resolution that I couldn't actually see those strands. The brief tut that I posted was just that - brief. There is quite a lot to preparing a channel for selection but it really is worth learning for just this kind of work. As I said, check out 'Photoshop Masking & Compositing' by Katrin Eismann where she goes into a LOT more detail. It is quite fascinating how an image contains its own mask. All you have to do is pull it out. Gordon |
Posted on 04/04/07 2:09:07 PM |
|
David Asch
Tech Support Posts: 1913 Reply |
Re: Background eraser
On the subject of built-in masks: an intersesting technique I picked up from Martin Evening's book when taking your own photos of objects (and possibly people) is to make sure there is a lot of backlight and expose for that. The subject will be silhouetted so you can easily darken it down to get a perfect selection. _________________ If you hold on to the past, sooner or later you'll lose your grip. |
Posted on 04/04/07 3:19:01 PM |
|
Whaler
Visual Viking Posts: 330 Reply |
Re: Background eraser
Chris, if you already haven't done so, you might try checking the "Protect Foreground Color" box and then sample the hair for the foreground color and then use the background eraser. _________________ !!!!!!!!!!!!!!! |
Posted on 04/04/07 4:44:16 PM |
|
chris berry
Overhead Overlord Posts: 724 Reply |
Re: Background eraser
Now why didn't I think of that? Cheers - that's done the trick. |
Posted on 04/04/07 8:21:58 PM |
|
Whaler
Visual Viking Posts: 330 Reply |
Re: Background eraser
Glad to be to your assistance! _________________ !!!!!!!!!!!!!!! |