| » Forum Index » Problems and solutions » Topic: Creating Pictures with Words |
|
Posted on 02/07/10 4:11:29 PM |
|
latchfordbob
* Posts: 12 Reply 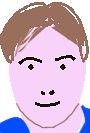 |
Creating Pictures with Words
I've seen some photos that have been created with words recently and can't work out how they've been done. I'm presuming that an automated tool has been used somewhere along the line where a list of words are compiled against a photo that has had its threshold adjusted. Any ideas (sorry for the size)  |
Posted on 02/07/10 7:10:01 PM |
|
Paul 2007 thru 2010
Lego Legend Posts: 361 Reply |
Re: Creating Pictures with Words
Ian Brown? |
Posted on 02/07/10 9:30:24 PM |
|
GKB
Magical Montagist Posts: 4102 Reply |
Re: Creating Pictures with Words
What you want to do is actually quite easy but time consuming as you end up with lots of text layers. Firstly open up an image of a face and then, using the pen tool, trace around the important parts of the face that you want to portray such as hair, eyes, mouth etc. Now, on its own layer stroke the path with a fine brush selected. This is your guide and will be thrown away when the image is complete. Now comes the tedious bit. Type in bits of text using lots of different fonts and font sizes. Mix and match with lots of layers and move them into place where you think they look good. Position the text close to your guide and keep the bits of text very close together but try not to have them overlapping. Use larger fonts for the main parts of the face and smaller fonts for the finer parts. Rotate them as you see fit around, e.g., the eyes and mouth. Use really small fonts in these areas. Keep all your text layers editable and do not rasterise them as you will then be able to edit things later if you are not happy with your design. When you have finished building up your image with all the text layers in place hide the background and your guide. All you should be able to see should be your text layers. Now select the topmost text layer and press Cmd-shift-alt-E. This will give you a new layer at the top of the stack which is a flattened and rasterised version of all your text layers which will still be intact underneath. Anything that is not visible in the layer stack will not be included in this layer. Save this file as a psd file. It will probably be quite a large file as there will be so many layers. Now re-save the file with a different name and throw away everything except that flattened layer. This will give you a much smaller file to work with for the final result and you will still have the original file to make any amendments. Cmd-click on the thumbnail to make a selection and then, on a new layer, fill with a gradient or colour of your choice. Hopefully you should now have a face just like the image you posted. Hope this helps. Gordon _________________ Why isn't 'phonetic' spelled the way it sounds? |
Posted on 04/07/10 5:23:21 PM |
|
latchfordbob
* Posts: 12 Reply |
Re: Creating Pictures with Words
Yes, it's Ian Brown
Thanks Gordon, that's what I expected really. I can't imagine the person who did this going to all that trouble though. I would have expected them to have done most of the work through an automated tool or website. |