
| » Forum Index » Image doctor » Topic: how to remove dust & skratches |
|
Posted on 17/02/07 10:53:58 PM |
|
vicho
Ingenious Inca Posts: 248 Reply  |
how to remove dust & skratches
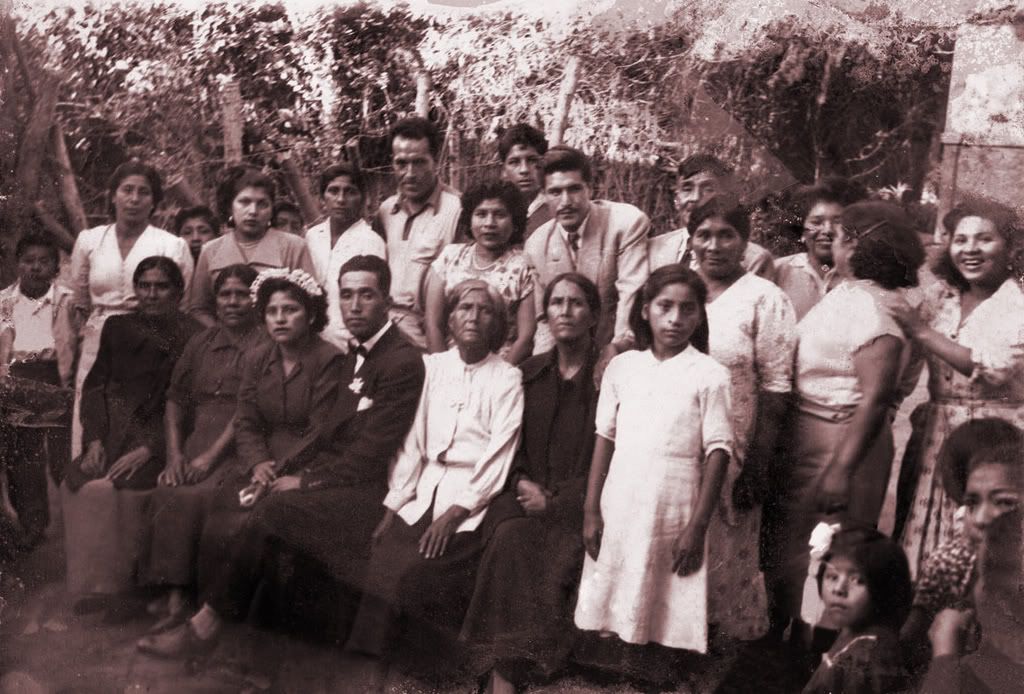
hi, this picture has many corrections to be made, but i´d like some suggestions on how to "erase" the dust is all over the pic , i`ve tried with filters like blur but all of them make it loses detail what would be the best way to work it? dustpic thanks |
Posted on 18/02/07 03:10:21 AM |
|
dave.cox
Marquee Master Posts: 518 Reply  |
Re: how to remove dust & skratches
Hi vicho, I was examining your picture. There are a number of techniques for removing dust specs on a photo. One is to simply use the tools in photoshop such as the healing tool to repair the damaged areas. The spot healing tool does wonders on small areas. I'm afraid however that your photo has much more going on with it than just a few dust spots. The top right corner appears to be either a stain or some uneven fading. Possibly from being partially exposed to different levels of light. The same along the left edge. The bottom right looks like it may have some damage to the paper, and maybe some crease marks. The entire photo is also faded. If I had the full resolution photo, much of this might be able to be repaired. I would need to see it to tell you for sure. 
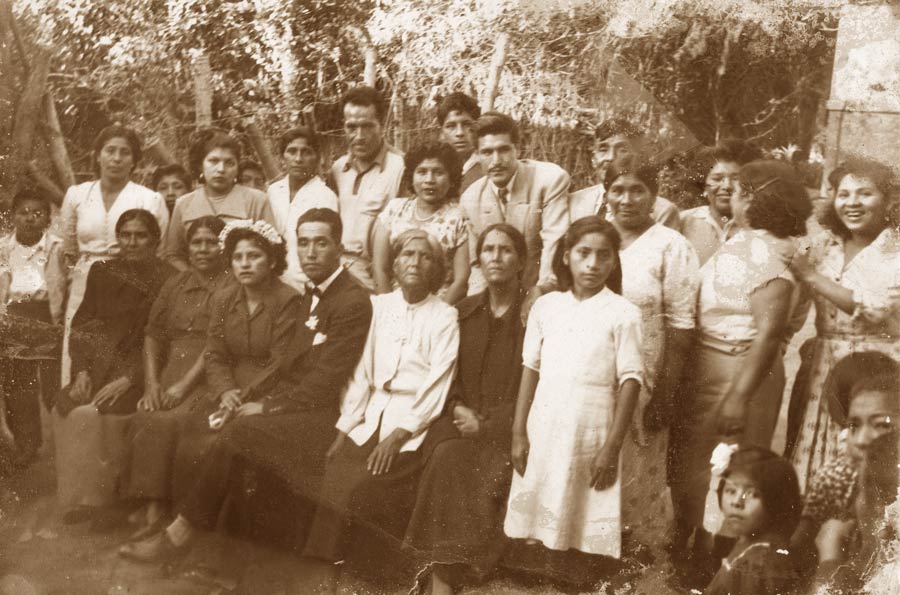
I went ahead and adjusted the levels on the photo to restore some of the tonal information, and did some minor touch up, to give you an idea of what might be done.  I'm afraid I can't give you one fix all, as there are entire books written on photo restoration. I'm afraid I can't give you one fix all, as there are entire books written on photo restoration.

|
Posted on 19/02/07 3:48:17 PM |
|
vicho
Ingenious Inca Posts: 248 Reply  |
Re: how to remove dust & skratches
thanks for the reply dave the level adjustment alone makes the photo looks a lot better! i was trying to fix it with filters and i forgot completely about the spot healing tool, great results maybe i should add that the photo was scanned with its glass frame, i mean they couldn´t be separated without the photo being ripped (i dont know if i`m using the correct word here) by the way, all the people in the picture are my relatives gathered for my grandparents´ wedding, my mom felt it was time to give it a little make over (she even suggested giving it color!  ) and send her cousins ) and send her cousins
ok. here is high res thanks a lot |
Posted on 19/02/07 6:25:39 PM |
|
vibeke
Kreative Kiwi Posts: 2167 Reply |
Re: how to remove dust & skratches
Like Dave, I have cropped the top part of the photo, as it's too damaged. I boosted the contrast the following way. 1. Duplicate the layer. 2. Change the mode to soft light 3. Lower the opacity on the top layer to about 62% 4. Flatten the image Now start all the hard work.... Once finished, you can get rid of the variation in colour, but chaning it to grayscale, then change it back to colour. Use variations to give it a sepia tone.  |
Posted on 19/02/07 6:27:32 PM |
|
vibeke
Kreative Kiwi Posts: 2167 Reply |
Re: how to remove dust & skratches
I have worked on just a small part of the photo, to get rid of dust etc. Using only spot healing brush and patch tool. don't for get the fade option.  |
Posted on 19/02/07 7:48:45 PM |
|
dave.cox
Marquee Master Posts: 518 Reply  |
Re: how to remove dust & skratches
I wouldn't convert to greyscale. There are better ways to convert to black and white, or sepia, and the information in the different color layers can often be used to reduce the damage and help rebuild the image. I wondered if that was your family. Wow. How did you get them all together at once. What a wonderful gathering of generations! Not to mention the historical significance. Fantastic! Restoration is kind of my area, so I will look at this later, and see how much I can do for you. It is not unusual for photos to get stuck to the glass, and when that happens it is better to not to try and remove it, as it will cause further damage. Scanning through the glass is the best thing. Most of todays scanners don't loose focus with the difference in distance. |
Posted on 19/02/07 8:13:02 PM |
|
vicho
Ingenious Inca Posts: 248 Reply  |
Re: how to remove dust & skratches
again thanks both of you cool tip from vibeke! that was kind of the first problem, to give it more contrast without losing detail, 
patch and spot healing tools work really well together |
Posted on 21/02/07 02:01:36 AM |
|
dave.cox
Marquee Master Posts: 518 Reply  |
Re: how to remove dust & skratches
Hi David, The procedure for this is rather lengthy. First thing I did, is go to the channels tab and look at all three channels, one at a time, to see which channel or combination of channels showed the least damage. In your case the green channel is the best, although they all are pretty close. You can do this by selecting each channel, red green and blue, individually to see which looks the best. Even though this is black and white and was scanned, there can be some significant differences in the color channel information. Before deciding, I also tried combining both the green and blue channels to see if that would produce a better result. I picked these two as they both are better than the red channel. You can do this by adding a channel mixer adjustment layer, and selecting the levels of the channels to keep. Also select the monochrome check box. The best image ended up being the green channel, so I converted the green channel grayscale by select the green channel and selecting convert to grayscale. Next, I adjusted the levels by adding a levels layer and adjusting as follows: 
Next I created a new work layer by pressing Ctrl/Shift/Alt E. This flattens all of the layers into a new working layer. Next step is to create 2 copies of this layer by pressing Ctrl J 2 times. Also add a black layer mask to each of these layers by pressing Alt and clicking on layer mask for each of the layers. I Label the bottom one “Lighter” and the top one “Darker”. Set the bottom one to lighten, and the top one to darken. Select the move tool, and move both of these layers 3 pixels down, and 3 pixels to the right. (press the down arrow and the right arrow each three times). With the Darker layer hidden, (Click the eye icon) select the lighten layer. Select the layer mask to edit, and with a small soft edged white brush set to opacity of 100%, dab the dark spots. When this is completed, select the darken layer, and do the same with the light spots. This will heal the damage spots less than 3 pixels. This method uses the original image as the sample, and usually creates the cleanest result. If you dab and it doesn’t look right, undo it, and leave it for later. Next I added another levels layer, with a mask to select the section that has extra fading in the upper right section of the photo. I adjusted the faded section to match the rest of the photo. I then added another blank layer, and called it “fixes.” This is where I started making actual repairs. By keeping the repairs on a separate layer, I can always easily undo any mistakes, or if need be, throw it away and start over. Here is what my layers look like: 

Of course this is by no mean finished, but you get the idea. As you probably noticed, I have restricted the repairs to the important areas, which is here is the people. The back ground can either be removed, patched in from another part of the background, or replaced completly, depending on your taste. |
Posted on 01/04/07 05:45:12 AM |
|
vicho
Ingenious Inca Posts: 248 Reply  |
Re: how to remove dust & skratches
Hi i decided it was time to start following dave.cox´s instructions (i finally have some free time now) but i got stuck right since the beginning, when you say: "I converted the green channel grayscale by select the green channel and selecting convert to grayscale" so it means that only that channel is converted to grey? how do you do that? |
Posted on 01/04/07 10:36:06 AM |
|
Wayne
Printer’s Devil Posts: 312 Reply |
Re: how to remove dust & skratches
With only the green channel visible, Go Image > Mode > Grayscale. When prompted to 'discard colour information?' click 'OK'. The image will become a single-channel Grayscale image. |
Posted on 02/04/07 9:56:36 PM |
|
vicho
Ingenious Inca Posts: 248 Reply  |
Re: how to remove dust & skratches
thanks, im working on the rest of the tutorial now |
Posted on 21/04/07 01:34:55 AM |
|
dave.cox
Marquee Master Posts: 518 Reply  |
Re: how to remove dust & skratches
Hi Wayne, I just noticed your comment. Actually, in this case, you do not want to use your method to convert to grayscale. Here is why. When you convert to grayscale by using the mode command, photoshop uses its own algorythem to adjust the image to grayscale. The method that I use is to add a Channel Mixer Layer, and select the Monochrome box, in the channel mixer dialogue. By doing this, I can then adust how much of each channel is used to convert the image to grayscale. This allows me to select the best channel, and discard the least usable channel, saving the most information. Also, since the adjustment is still in a layer, instead of changing the mode to grayscale, I still have access to all of the RGB tools, and I have not destroyed the original image. If I don't like the adjustment, and want to discard it, or change it, I can easily do so.  |
Posted on 25/08/07 4:15:00 PM |
|
andrekaze
* Posts: 6 Reply |
Re: how to remove dust & skratches
sometimes I use SELECTION + FILTER NOISE- Dust And Skratches But it won't solve all your problems. |