
| » Forum Index » Image doctor » Topic: Photo restoration |
|
Posted on 18/03/10 4:29:32 PM |
|
eblyth00
* Posts: 16 Reply |
Photo restoration
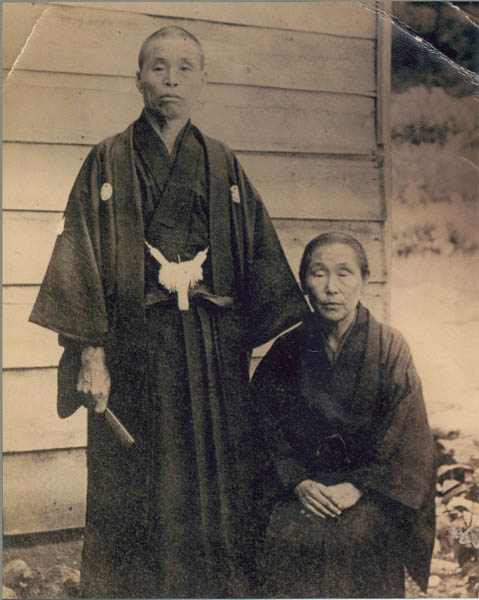
I'm trying to restore a very old photo for a friend. Its basically from the dawn of photography and has a ton of noise, and horrible contrast for edges, any tips would be greatly apreciated |
Posted on 18/03/10 4:35:25 PM |
|
GKB
Magical Montagist Posts: 4102 Reply |
Re: Photo restoration
As every restoration brings its own problems you will really need to post a copy for us to see _________________ Why isn't 'phonetic' spelled the way it sounds? |
Posted on 18/03/10 4:48:04 PM |
|
eblyth00
* Posts: 16 Reply |
Re: Photo restoration
here you go  |
Posted on 18/03/10 5:37:48 PM |
|
Steve Caplin
Administrator Posts: 7110 Reply |
Re: Photo restoration
Fantastic photo! The creases are easy to deal with - just use the Healing Brush or Clone tool to paint them out. Your biggest problem is the noise. However, it only seems to affect the clothes, and not the hands or faces, so that's a bonus. I'd recommend making a new layer set to Darken mode, then sampling colours out of the robes and painting over on the new layer. This should help to get rid of most of the speckling. It's so pronounced I can't see an automated way of doing it. Anyone else care to have a go at this one? |
Posted on 18/03/10 5:39:46 PM |
|
Nick Curtain
Model Master Posts: 1781 Reply |
Re: Photo restoration
Gordon is right, but there are a few quick fixes. Convert the image to mono via adjustment layer and recolour. This removes any colour tone variations. You can try the B&W adj layer, or gradient map with foreground / background colours set to B&W. The latter may be too high in contrast though. Healing brush, clone and Patch tools for the obvious artifacts Use Dust and Scratches filter to remove noise on the clothes. Go to history and set the history state to before the D&S was applied, but set the paint to the D&S state. Select the history brush and set the blend mode of the brush (not layer) to darken. When you paint in the D&S history state, it will only darken the hidden spots. Nick |
Posted on 18/03/10 6:01:42 PM |
|
Jota120
Ingenious Inventor Posts: 2615 Reply |
Re: Photo restoration
.... agree GKB, and suggest provide highest quality scan/photo Need highest quality so can get the most of the limited information to start from. Shannon's information Law and Hiesenburg prevail. BTW, there a few excellent books on these types of problems (not all). Some excellent skilled friend can help you here... |
Posted on 18/03/10 6:19:31 PM |
|
Jota120
Ingenious Inventor Posts: 2615 Reply |
Re: Photo restoration
Oh! I am too late. That is not so difficult! You can get a great image from that. Give us or to you your largest scan |
Posted on 18/03/10 7:51:10 PM |
|
eblyth00
* Posts: 16 Reply |
Re: Photo restoration
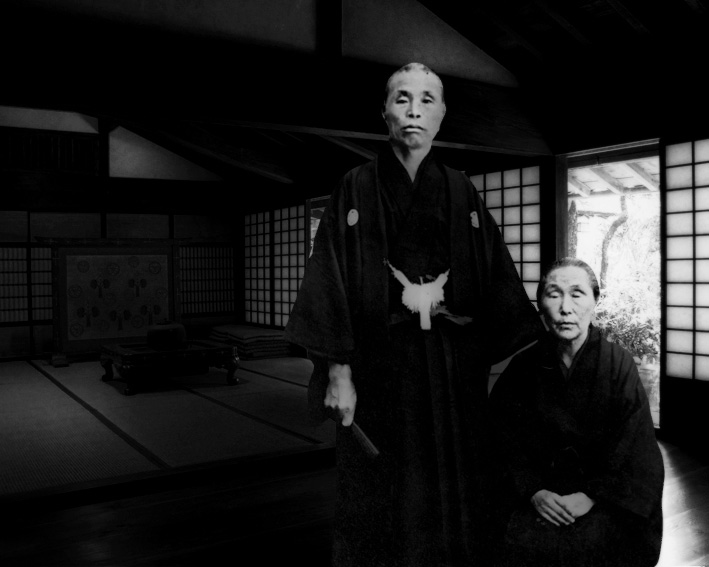
I ended up having to really rush this one since she wants it asap and I'm not charging anything but here is what I have in the center theres a piece i forgot to cut out, I'm fixing it now.  |
Posted on 18/03/10 7:55:16 PM |
|
Jota120
Ingenious Inventor Posts: 2615 Reply |
Re: Photo restoration
Oh I see. Its a very good result. Interesting. We could give critique, but guess you do not want today. You lost a lot of information and Steve might give you comments on perspective, okay I can as well 
Enjoy! Thanks for sharing. |
Posted on 18/03/10 8:00:50 PM |
|
eblyth00
* Posts: 16 Reply |
Re: Photo restoration
If you want to critique thats fine I am very new to photoshop and could use all the pointers I can get, I could definitely spent more time on this and will probably. she was just in a hurry to get it. Thanks for all of your help. I ended up using I high pass filter with a low radius then duplicating that layer until it was over sharpened the I applied a Gaussian blur all with a clipping mask to the kimonos, that seemed to work for the most part. Then I created a new layer and followed Steve's advice from there. |