
| » Forum Index » Readers' gallery » Topic: Ebenezer Branch |
|
Posted on 20/02/26 9:57:25 PM |
|
tom8gem@gmail.com
** Posts: 68 Reply |
Ebenezer Branch
My new piece, another view from the marshes of Delaware100% Photoshop illustration! I've been refining techniques learned years ago from "The Great Outdoors" chapter. That book and especially that chapter have had a huge impact. 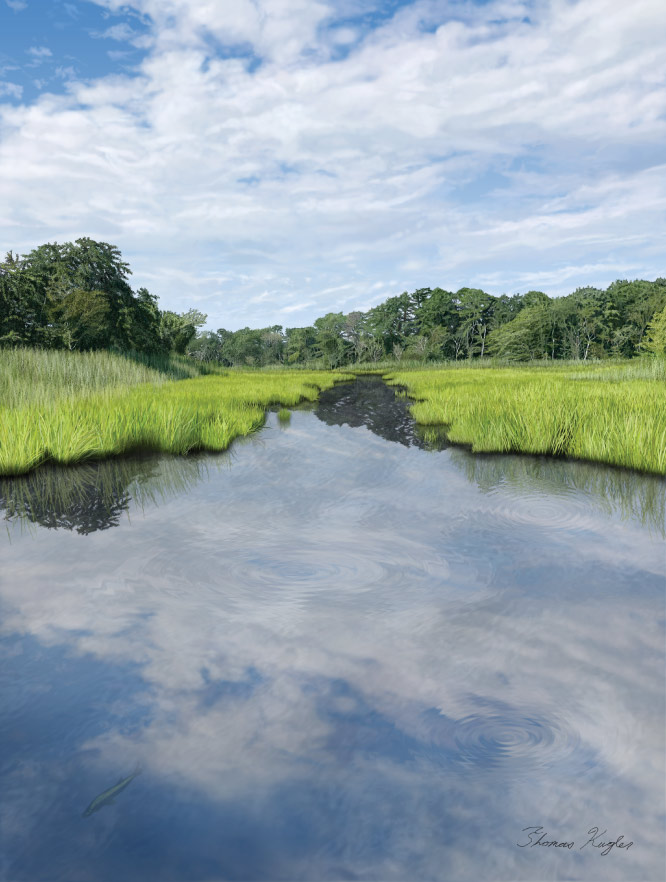 |
Posted on 21/02/26 05:19:16 AM |
|
tooquilos
Wizard of Oz Posts: 2961 Reply |
Re: Ebenezer Branch
That's spectacular, Tom! _________________ Wicked Witch of the West:I'll get you, my pretty! And your little dog, too! |
Posted on 21/02/26 10:00:46 AM |
|
Steve Caplin
Administrator Posts: 7143 Reply |
Re: Ebenezer Branch
The ripples really make it. I like how you can see the fish underwater. How did you make the trees? |
Posted on 21/02/26 7:33:26 PM |
|
tom8gem@gmail.com
** Posts: 68 Reply |
Re: Ebenezer Branch
Thank you so much! |
Posted on 21/02/26 7:50:06 PM |
|
tom8gem@gmail.com
** Posts: 68 Reply |
Re: Ebenezer Branch
Thank you, SteveI much appreciate it! I enjoyed revisiting the ZigZag filter for the ripples; it's been a while. 
The trees are more or less the same process outlined in your book, just adapted for the subject. Trunks and branches are painted in gray, then bark layers are clipped onto them. Since they're so distant and barely visible, I skipped the Liquify filter, but warp-transformed bark layer copies on a per tree basis, to fit each one's shape. Leaves are done as you've described, plus changing brush colors often to accurately represent shifts in lighting and coloration. Painting leaves from back to front, over each other even on the same layer to distinguish one tree from another, "dabbing" vs. "spraying." |
Posted on 22/02/26 2:45:50 PM |
|
DavidMac
Director of Photoshop Posts: 6066 Reply  |
Re: Ebenezer Branch
I love zig zig for reflections too. I think it often works better than the ripple filters. This is terrific Tom! It's utterly convincing. Without close examination I would never have guessed it was painted. The give away, to my eye, is the tree reflections in the distant central creek. In the foreground we can see through the water to some extent - exactly as you have correctly shown it. However, that far away, we would be viewing it at a very oblique angle, almost parallel to the surface. It would be a perfect mirror and the reflections would be exactly the same colour and brightness as the trees themselves not darkened as you have shown them. That's my personal theory. It's very picky, but I think it's correct. But this is still bloody marvellous work! _________________ The subtlety and conviction of any Photoshop effect is invariably inversely proportional to the number of knobs on it ....... |
Posted on 22/02/26 3:26:25 PM |
|
tom8gem@gmail.com
** Posts: 68 Reply |
Re: Ebenezer Branch
Thank you, David; that's great to hear! I think you're right; the back trees reflection is a little too dark, with muted colors. I may go back and modify that; it could get fussy since it's on the same merged layer with the ripples. |
Posted on 22/02/26 9:53:34 PM |
|
tom8gem@gmail.com
** Posts: 68 Reply |
Re: Ebenezer Branch
Here's a corrective pass with the back trees reflection lightened up. It wasn't that fussy; I just copied the merged water layer, masked out everything but that reflection, and clipped a Levels adjustment layer onto that.  |
Posted on 24/02/26 5:22:00 PM |
|
DavidMac
Director of Photoshop Posts: 6066 Reply |
Re: Ebenezer Branch
If theres one thing I really hate its people who alter other peoples images unbidden. Its alway struck me as presumptuous and verging on ill mannered. We accept (and hopefully welcome) this from Steve because we also accept that he has a very perceptive eye and huge experience and knowledge from which we can learn. But suddenly I find myself doing it to Tom, not because of expertise (quite the reverse because I am quite unsure of myself here) but quite simply because its easier to show what I want to say than to explain it. So, with my apologies Tom, here we go . As I said in an earlier response I think that our angle of view is so oblique to the distant water that, aside from ripple distortions, it would be a perfect mirror. This is very calm water and at such a great distance I dont believe rippling is really an issue. I do believe, however, that the tress and foliage would be a nigh on perfect reflection in terms of brightness and colour. I dont think they would be darker but possibly just a little bit washed out. I havent even attempted here to deal precisely with the edges my only concern is what would happen with the reflections In the main body of the distant water. I think what I have done here is probably close to reality but I really am not sure. I am ready to be shot down in flames over this and would love to hear what others think. Once again Tom my apologies for co-opting your image in this possibly arrogant manner but it was the only way I could see to explain my opinion and, please, it is only that - opinion.  _________________ The subtlety and conviction of any Photoshop effect is invariably inversely proportional to the number of knobs on it ....... |
Posted on 27/02/26 05:26:19 AM |
|
tom8gem@gmail.com
** Posts: 68 Reply |
Re: Ebenezer Branch
David, that's really good, I thank you for that. It does look great this way, and would very likely help to address the perception/reaction of the first person I showed it to (my sister): "What's thatoh, the reflection of those trees back there?" This treatment makes that way more obvious. I was going for fidelity to the reference photo, but this is all about "cheating," right? I'm not above enhancing reality when it benefits the piece!  |
Posted on 27/02/26 08:27:26 AM |
|
DavidMac
Director of Photoshop Posts: 6066 Reply |
Re: Ebenezer Branch
Thank you Tom. I was concerned I was overstepping the mark.Glad you are happy. _________________ The subtlety and conviction of any Photoshop effect is invariably inversely proportional to the number of knobs on it ....... |
Posted on 27/02/26 08:40:49 AM |
|
dwindt
Realism Realiser Posts: 1026 Reply |
Re: Ebenezer Branch
Stunning job Tom. If anything, try distorting your shadow slightly. Those ripple rings and any surface distortion will play a big role with how your reflection looks. Outstanding though, Tom. Well done! _________________ The grass is greener on the other side of the fence because there is more $hit there. |
Posted on 04/03/26 07:30:05 AM |
|
tom8gem@gmail.com
** Posts: 68 Reply |
Re: Ebenezer Branch
Thanks so much Dennis and David, it's always great to hear your impressions. I'm onto my next piece, but I went for one more corrective pass!
All kidding aside, I appreciate your input, and feel my works are better as a result of it. My next one will be more architectural, a Dutch-style historic building. There'll be a lot of carved stonework; I'm looking for ways to approach that. For now, my best guess is to paint the shapes in gray, dodge & burn, then texture, color, etc. 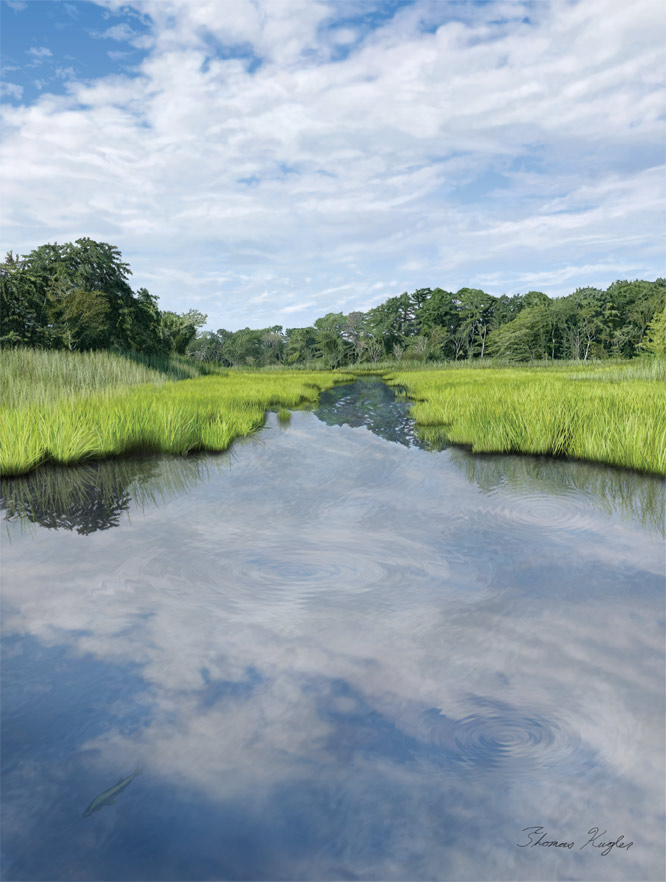
|
Posted on 04/03/26 11:49:18 AM |
|
DavidMac
Director of Photoshop Posts: 6066 Reply |
Re: Ebenezer Branch
Looks good Tom. Whilst I am reasonably competent on how things should look from having a professional photographic background, I am not strong on hand painting techniques, but I think what you suggest for your next image sounds very intelligent. I suspect that Dodge and Burn may get a lot of use here. Because I am not so good at hand painting I try to always use non destructive Dodge/Burn. Here's a tip (which you probably know already of course). Create a layer filled with 50% grey. Clip it to the image layer you want to dodge and burn. Set the layer mode to Overlay. The layer will appear transparent. Use your dodge and burn on this layer. If you get it wrong you haven't changed the image layer beneath and you can try again. Once you are happy you can either leave it as it is or merge it down to make the change permanent. You can also soften the effect by using Soft Light blend mode instead of Overlay. (Incidentally, although it doesnt change the tool in the tool palette, pressing and holding the Alt or Opt key will switch the Dodge or Burn tool to their opposite mode while painting). To create a 50% Grey layer of this sort Alt or Opt click the New Layer button at the foot of the layers palette. In the dialogue that opens, name the layer if you want. Check Use previous layer to create mask. Select Overlay as the mode. Check the box "Fill with overlay neutral colour which will appear at the bottom of the dialogue. Click OK. An alternative to Dodge/Burn is to use a clipped completely empty layer in Overlay or Soft Light mode at low opacity and paint on it in varying shades of grey. Forgive me Tom if I am teaching you to suck eggs. 
_________________ The subtlety and conviction of any Photoshop effect is invariably inversely proportional to the number of knobs on it ....... |
Posted on 06/03/26 02:40:30 AM |
|
tom8gem@gmail.com
** Posts: 68 Reply |
Re: Ebenezer Branch
Thanks so much David, I much appreciate your tips and insights. I'm not sure I entirely follow, or whether we're talking about the exact same thing. It seems to me like your concern here is with not directly altering source photography, via non-destructive editing on an additional layer. While I use photos for reference, no photographic elements will remain in the final piece; it will be a recreation. So, I'd be painting shapes onto their own layers in 50% gray, then dodging/burning only these. Very much like the skull in the last chapter of "100% Photoshop." I hope that clarifies my intent; what's unclear to me is whether that's necessarily the best or only approach to these stonework elements. I've attached a screenshot inset sample of what I mean. Please let me know what you think. 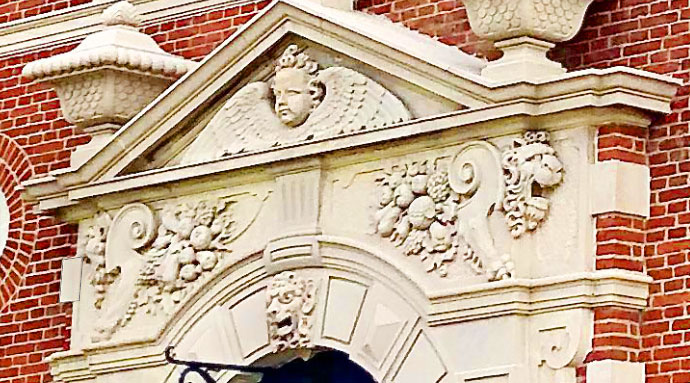 |
Posted on 06/03/26 09:41:46 AM |
|
DavidMac
Director of Photoshop Posts: 6066 Reply |
Re: Ebenezer Branch
Hi Tom I wasn't really trying to suggest how you should do things. I truly have very limited experience of hand painting. I merely wanted to point out that, if you are going to be doing lot of Dodge and Burn, then doing it on Overlay layers is very flexible and reversible. I do take your point that I am thinking completely photographically and because, in your case, it's part of the creation and painting process, you don't need to think like that. Indeed, since these are a personal challenge, it may well be that you really don't want to think like that. My guess is that you want to try and paint in a manner that is as close to real physical painting as possible and to discipline yourself to avoid too many photoshop aids to do this. I love setting myself personal challenges of this sort. Its a fantastic way to learn. I do occasionally try making 100% photoshop images without any photographed elements or textures using only basic hand tools and layer adjustments, but no filters or effects. But, in my case, even though no photography of any kind is involved, my aim is to produce a hundred percent realistic 'photograph' convincing enough for people to believe it is one. I am not looking to create a 'painting'. I've posted this before, but here's an example. This was made by breaking an egg into a teflon pan, setting it beside my display and re-creating it by eye in Photoshop just as one would a traditional still life. Because of the hard clean edges this was mostly drawn using the bezier tools to produce curved outlines which were converted into selections and filled with solid colour. These were then overpainted with soft brushes on multiple image and mask layers in different modes. Some basic adjustment layers (curves and HSL mostly) were used and, in this case, I did allow myself just two basic filters: Noise and Gaussian Blur. It was a lot of work but I learned so much from it and was forced to push myself outside my comfort zone. Good luck with your next project. I'll watch this space .......... 
_________________ The subtlety and conviction of any Photoshop effect is invariably inversely proportional to the number of knobs on it ....... |
Posted on 07/03/26 03:53:28 AM |
|
tom8gem@gmail.com
** Posts: 68 Reply |
Re: Ebenezer Branch
Thanks again, David; this is a fantastic still life recreation! Thinking back, it's clear that you've been aware of what I've been doing with such works as the one in this post; this added to my confusion per your non-destructive approach guidance. I may still be missing something; perhaps painting my shapes in gray first on however many layers, then having another gray layer above these set to Overlay for dodging/burning could be something to try. I do try to do things "painterly," but also use certain filters frequently (e.g., clouds, noise, blur) and others sparingly (e.g., wave, motion, glass). It's an interesting point that while much of what we do shares similar techniques and approaches, I do strive for a painted look, while what you aim for here, we could call more photorealistic. An artist I know called my work hyperrealism; I like that term, it fits. Either way, this does add up to a lot of work, especially when it comes to illustrating such intricately detailed carved stonework, as seen in the screenshot. I recall painting that skull from the book with dodge & burn on gray being one of the most time-consuming and labor-intensive things in there, and I suppose I'm looking for shortcuts, since that doorframe's ornamentation seemingly calls for quite a lot of that. I've got my work cut out for me, yet am not complaining since it's not worth doing if you're not going to bring it your full and proper attention, don't you think? |
Posted on 08/03/26 12:34:03 PM |
|
DavidMac
Director of Photoshop Posts: 6066 Reply |
Re: Ebenezer Branch
Although I use it photographically Clouds is one of my absolute favourite filters. Normally I only ever use monochromatic clouds with the base colours set to black and white. Used lightly and transparently it's a wonderful way of aging things by introducing weathering, and staining and fading. Once again I use it on a clipped layer above the image layer and use blend modes and transparency to change and control the effect and its strength. (Screen mode makes great ground mist.) I use monochromatic noise the same way on its own clipped layer (Multiply for black noise, Screen for white noise and Overlay for a mix of both.) And yes! "Work cut out for you" is how we stretch ourselves and progress. If you are not bound by the inevitable shortcuts that time restraints can impose in a professional context, devoting time to "proper attention" is exactly right. As a retired man I can spend time with 'focused playing' - in my case experimenting mostly with techniques for manipulating light and shadows. It can be very rewarding sometimes. _________________ The subtlety and conviction of any Photoshop effect is invariably inversely proportional to the number of knobs on it ....... |
Posted on 12/03/26 10:59:47 PM |
|
tom8gem@gmail.com
** Posts: 68 Reply |
Re: Ebenezer Branch
A wise man once said, "The Clouds filter is great for just about everything but clouds" (or something to that effect). Another once said, "It's not worth doing, if you're not going to do it right." |
Posted on 13/03/26 5:14:57 PM |
|
DavidMac
Director of Photoshop Posts: 6066 Reply |
Re: Ebenezer Branch
I like that. It's quite true!
My grandfather, who was a big influence and role mode for me, used to say that. He put it the other way round "A job worth doing, is worth doing well.". I can hear him now! _________________ The subtlety and conviction of any Photoshop effect is invariably inversely proportional to the number of knobs on it ....... |
| page: 1 2 last |