
| » Forum Index » Reader's Tutorials » Topic: Hoses and Flexible Pipes |
|
Posted on 15/11/14 6:45:00 PM |
|
Deborah Morley
Makeover Magician Posts: 1319 Reply |
Hoses and Flexible Pipes
After Gordon did his hoses, I thought I'd have a few goes. 1 was a Scott Kelby tutorial which I added to and the others are bits that I have learned from Steve's books and then added to. If anyone is interested I'll do a quick tutorial.  |
Posted on 15/11/14 9:07:19 PM |
|
GKB
Magical Montagist Posts: 4130 Reply |
Re: Hoses and Flexible Pipes
... and very nice they are! _________________  |
Posted on 17/11/14 07:57:23 AM |
|
Steve Caplin
Administrator Posts: 7135 Reply |
Re: Hoses and Flexible Pipes
Very interesting. Tutorial, by all means! |
Posted on 18/11/14 10:08:06 AM |
|
DavidMac
Director of Photoshop Posts: 6038 Reply  |
Re: Hoses and Flexible Pipes
Yes. Very interesting! Just looking at them has given me a couple of ideas ...... _________________ The subtlety and conviction of any Photoshop effect is invariably inversely proportional to the number of knobs on it ....... |
Posted on 24/11/14 6:51:25 PM |
|
Kathryn
Woodland Wonder Posts: 84 Reply |
Re: Hoses and Flexible Pipes
Deborah, Hi. I would be interested in seeing your Photoshop tutorial on hoses. Did you make a PS custom brush??? In Illustrator you can create (seamless) Pattern brushes and stroke paths. I see with Illustrator CC, you now can make custom brushes and stroke a path using raster images. For a little added realism, I would add some custom highlights and shadows on separate layers/masks. Actually I would probably use Photoshop>Illustrator>Photoshop. Looking forward to your tutorial! Kathryn |
Posted on 25/11/14 6:06:16 PM |
|
Deborah Morley
Makeover Magician Posts: 1319 Reply |
Re: Hoses and Flexible Pipes
The first hose was taken from a Scott Kelby tutorial and then amended by me. Create a new document - make a new layer (Layer 1) and paint a curvy line with a hard-edged brush using a medium grey colour. This can also be done using the pen tool and then stroking the path. Use Bevel and Emboss to get an effect you like. Load this as a selection then expand it by a small amount 3 to 5 pixels,and then on a new layer (Layer 2) fill this with medium grey again. Copy your Bevel and Emboss settings from Layer 1. Create a new blank layer (Layer 3) and merge Layer 2 into this, this is to prepare for the next part. Select a small hard-edged eraser and erase across your curvy line; click on one side of your line then holding shift click on the other side. This will give you a straight erased section. Continue doing this all along your line. If you didnt merge layer 2 into a blank layer before you started erasing, you would get Bevel and Emboss on all the edges. When you have finished, load this then bring up Refine Edge and just soften the edges and corners. Duplicate this Layer. You now have your Background layer, Layer 1; your original curvy line, Layer 3 and Layer 3 copy. On Layer 3 copy bring up Drop Shadow until you get a nice effect on the layer beneath 
Make a new Layer (Layer 4) and merge your Layer 1 down into it to stop Bevel and Emboss affecting the next move. Now merge Layer 3 into this new Layer. Now clip Layer 3 copy to Layer 4. This means you only get the shadow showing on your curvy line and not into your surroundings. 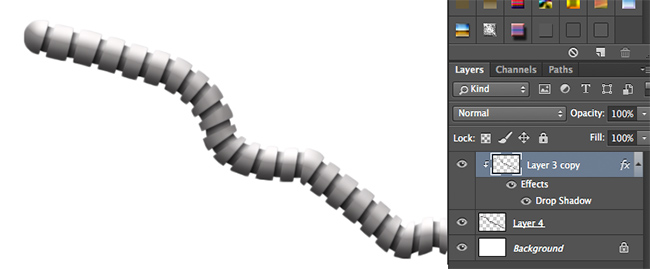
Load up Layer 5 as a selection, make a new layer, fill with a medium grey, and set it to Hard or Soft Light whichever you prefer, add some noise, then Dodge and Burn to give it a bit more depth. You can then colourise it as you wish.  |
Posted on 25/11/14 6:07:32 PM |
|
Deborah Morley
Makeover Magician Posts: 1319 Reply |
Re: Hoses and Flexible Pipes
It worked! Now for the rest. |
Posted on 01/12/14 5:36:31 PM |
|
Deborah Morley
Makeover Magician Posts: 1319 Reply |
Re: Hoses and Flexible Pipes
The idea of this hose came from Steves book Art & Design in Photoshop - Fabric Badges, and was then adapted. In a new document make a new layer and then with the pen tool make a curvy line, you will need this path again so save it. Stroke this path with a hard-edged brush, mine was size 20 mid-grey as usual. Do a Bevel and Emboss as you like. Make a new layer, Brush size 25 and then as per Steves book; in the Brush Tip Shape section set the angle to 90%, roundness at 36% and spacing at 200%. In the Shape Dynamics section set the Angle Jitter to Direction. Stroke the path. 
Apply a Bevel and Emboss you like. Again I loaded up the selections of both layers added a new Layer filled with mid grey and did a bit of Dodge, adding some noise as well. Burn didnt work too well so on a new layer I stroked the path (remembering to reset the settings) with a hard small white brush. Added a Gausian Blur, erased a few bits and then Smudged. Trying to apply a shadow on Layer 2 didnt work too well. So with the brush on the same settings as Layer 2 on a new Layer (shadow) I copied the Path and edged the start point over slightly. I then stroked that with a black brush, blurred it, lowered the opacity and clipped it to Layer 1. It doesnt work to just make a copy of Layer 2 filled with black and then nudged over as it doesnt follow the line of the path. 
|
Posted on 01/12/14 7:17:13 PM |
|
Deborah Morley
Makeover Magician Posts: 1319 Reply |
Re: Hoses and Flexible Pipes
This is a continuation of sorts of the hose above. I have given brush sizes only because there is quite a lot of messing around to get the spacing right(ish) Again in a new document; I liked the 2nd hose I did but wanted to make concave curves in between the oval brush shapes so I made a new brush. Again I made a new path (this doesnt work too well with tight curves). Brush size 29 Angle 0% Roundness 100% Spacing 130%, in Shape Dynamics set to Direction as before and stroke the path. I added a Bevel and Emboss. 
New Layer and copy the initial path and move the start point slightly so it sits between the first two brushes on Layer 1. Using a hard edged brush again Size 34 Angle 90% Roundness 36% and Spacing 206, again set to Direction stroke the path. Add Bevel and Emboss. I added a shadow in the same way as the 2nd tutorial. As Layer 1 didnt look much like a hose I made a new Layer and stroked the path with a size 34 hard edged brush and came up with this. 
Not what I meant to do but quite liked it, however I did a Bevel and Emboss and clipped it to Layer 1. Turned on and off Bevel and Emboss in Layer 1. Endless possibilities. 
|
Posted on 04/12/17 2:41:19 PM |
|
jesseramirez
* Posts: 1 Reply |
Re: Hoses and Flexible Pipes
This guide is really great! Thanx |